Friday, March 21, 2014

Camouflage Cupcakes

For St. Patrick's day, I wanted to put together a camouflage cupcake. I used 1 white cake box mix and 1 devil's food cake mix. This will make approximately 48 cupcakes.

To start I mixed up both batters then divided each batter in half using medium sized bowls. I made the mistake of using too small of bowls and then not having perfect proportions..... either way your cupcake will look good and be delicious. I do want to express the necessity of following the directions on the box when mixing batter.

Keep one bowl white or add 1 spoon full for a more cream color. Add 4 or more spoonfuls of white to one of the browns for a lighter brown color. For the green take approx 3 spoonfuls of brown to the other white then add green food coloring to desired color.

When adding the batter to the cupcake tins i tried a couple different ways. First use a smaller spoon. I used my tried and true baby spoons from my godson. He thinks this means they are all for him. (Oh toddlers) i found that 6 spoonfuls using those spoons (you can get them at the dollar store) will fill my tins the perfect 2/3 full. I just layered my coloring not trying to be perfect. Just kind mix it up. I found i liked it when i took a toothpick and swirled the colors. Baking them as directed on box.

After letting cool, frost with desired frosting. I mixed up some basic buttercream and added some green food coloring. Using a piping bag and large star tip for the frosting.

Tuesday, March 11, 2014

Rainbow Cupcakes pt. 2 with Buttercream Recipe

I've been really liking the rainbow cupcakes i just made, Sri much so that i wanted to try it another way and share my results. Plus i just can't help myself with wanting to try new things. :)

I just used a basic white cake mix from the store. I just like working with box mixes right now. Following the directions on the box, i mixed up all the ingredients. I wanted to see if i could get all 6 colors in so i used my godson's toddler bowls to split up the batter equally as best as i could. I just grabbed a 1/2 cup measuring cup and tried to make sure they were even by doing one scoop at a time.

Once they were all separated i added my color. I use Wilton because i like the color results. Making sure to not over mix but getting the color throughout the batter. I once again received assistance from the godson and used his plastic baby spoons. This worked out awesome for adding the colored batter to the cupcake liners. I did one heaping scoop of each color into the cupcake tins lined with cupcake liners. I got 23 total cupcakes. Keep in mind the order you want your colors to be in. I put purple on the bottom then, blue, green, yellow, orange with red on top. Baking as directed on the box or recipe you're using. Let cool completely before frosting.

Now for the fun part. I decided i wanted to use buttercream (recipe below) and colored it sky blue. To frost i just used a large star tip in a circular motion working from the outside rim of the cupcake to the middle. To make the rainbow i found some rainbow sour gummy rope at my local store in the candy section. I cut each ribbon in half and positioned in the frosted cupcake. To make the clouds i just used about 1/2 cup of the frosting un-colored and put it into a sandwich size plastic bag. Cut the tip off the bag and squeezed a small cloud on either side of the rainbow and voila! A awesome rainbow cupcake! Enjoy! Please share your results if you try it.

Buttercream Recipe
1/2 stick unsalted butter (1/2 cup)
1 cup shortening
1 teaspoon vanilla extract
3 1/2 cups powdered sugar (confectioners sugar)
1-2 tablespoon milk

Directions:
1. Combine butter and shortening in bowl. Use mixer on medium/high speed for approximately 2 minutes. Should look light and fluffy.
2. Add vanilla and mix thoroughly.
3. Add powdered sugar 1 cup at a time, mixing thoroughly after each added.
4. Once all sugar had been added, add 1 tablespoon of milk. If frosting is still too thick add 1/2 tablespoon at a time till desired consistency.
5. Add colors as desired.

Sunday, March 9, 2014

Finger Paint DIY

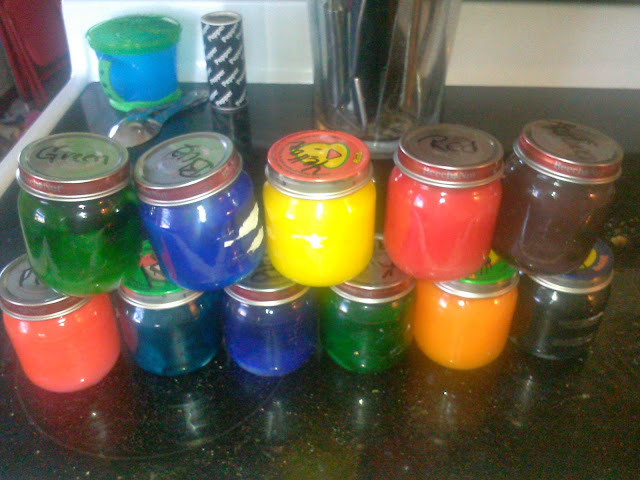
I do at home daycare and always love finding new projects and fun things to do with the kids. I have a recipe for finger paints using just basic stuff that everyone has in their cupboards. Not to mention recycling baby food jars. The whole process took a couple hours to make, but in the end was completely worth it.

I figured this wasn't something that i would want to have a small batch of so i quadrupled the recipe and ended up with 20 small baby food jars full. I used Wilton food coloring for the color just because that was what i had on hand and they always give me a nice vivid color. 

I can't stress enough how this is a time-consuming project. Between the cooking process to cooling and coloring when you make this large of a batch. Obviously if you follow the recipe you will have a smaller batch to work with.

 I first put all the ingredients in the pot and turned the heat on low.I slowly worked up to medium heat just because I didn't want to have anything burn our boil too fast. This did take longer doing it this way, but I feel like it was more worth it in the end. I would keep checking on it while it was heating up and stirring often. I would say about every 2-3 minutes. I truly felt like it was never going to get thick and i just wasted all this stuff when it finally thickened up. So if you feel like its taking too long, just be patient and it will happen. Just keep stirring with your whisk and wait. Once it thickened up take it off the stove immediately to cool. To me the end product had a consistency that reminded me of pudding. The color is almost like Vaseline.... not really cute. Lol. 

After letting the mixture cool completely i divided it into the baby food jars. Don't be like me and fill it to the top..... It will make it quite difficult to mix in the colors. They always say hindsight is 50/50. There really isn't a super easy way to put it in the jar due to the consistency. Just do your best. I just used a spoon and spooned it in. Now the part that will be relatively easy, adding color. I suggest using a small spoon or even a baby spoon to mix the color in each jar. The size of the spoon will help mix the color thoroughly. 

Now the part that makes all the hard work worth it, letting the kids get messy! I just used one of those paint pallets you can get at the craft store for a dollar, to scoop paint into for the kids to play. I think it makes it easier for little hands and also prevents your paints from getting mixed. The color transfer is really good and clean up is really easy. I loved doing this for the kids. Also gives them a huge array of colors. This would also make good birthday party favors for the kids. If you need help with the sticky glue that's on the baby food jars, just use some acetone nail polish remover to get the glue off. Hope you enjoy this fun project!


Recipe....

Ingredients:

3 tablespoons granulated sugar

1/2 teaspoon salt 

1/2 cup cornstarch

2 cups water

Food coloring 

Small containers

Directions:

Add all ingredients into small saucepan. Place pan on low heat for 5 minutes stirring often. Use whisk to mix all ingredients. Raise to medium heat and continue to whisk until mixture thickens. Remove from heat and let cool completely. Separate into containers and add desired food coloring, mixing completely and enjoy!


Thursday, March 6, 2014

Rainbow Cupcakes

This winter has been absolutely miserable and cold all around. To get out of that funk I decided that a little color was needed. I've seen a lot of rainbow ideas and thought what the heck, lets try some rainbow cupcakes! :-) I decided i only wanted 5 colors in the cupcakes and i would make some color swirl basic buttercream frosting. I chose to use red, yellow, green, blue and purple for the cupcakes and use orange and red for the frosting.

 I mixed a basic vanilla box cake with a hand mixer following box instructions. I have to say it is oober important that you mix as directed. If the box says 2 minutes count to 60 in your head twice out set a timer. The batter needs this to get to tree right consistency for nice fluffy cupcakes that we all love to snack on. 

Split the finished batter into five small bowls. I used my godson's toddler bowls cause they were just the right size. Lol. For the color i like using the Wilton gel colors. Some colors come out pretty vivid and others take a lot of the coloring. 

I wasn't sure how i wanted to add the batter to the pan for the best results and came up with using plastic baggies. I poured each bowl into a baggie and cut off the tip off my first color. I decided i wanted the blue on the bottom and work through the colors in order of the rainbow. I squeezed what looked like the same amount into each liner. Put them in the oven following box directions.

For frosting I'm pretty basic because I love a simple buttercream frosting. It is just right for sweetness and it is just so easy. I make basic buttercream frosting using half butter and half shortening. I like the lighter taste like this. 

They turned out amazing. However the frosting didn't come out quite as dark as i wanted. Next time..... lol. I'm gonna have to do this again with my godson for St. Patrick's day. Tell me what you think! Any other ideas i should try?